# Setup
The ArdenSuite integrated development environment (IDE) allows to develop Arden Syntax medical logic modules (MLMs). The ArdenSuite IDE uses the open source platform Eclipse as its core. Therefore, users can use all Eclipse functionalities and additionally install other Eclipse-compatible plugins as well.
The Support Pages at hand describe those features that we added to the Eclipse core. Medexter Healthcare can provide support for the ArdenSuite IDE features only. Should you need assistance with any of the original Eclipse functionalities, please refer to Eclipse documentation and support.
NOTE
After installation and activation, read our instruction manual How to compile, test, and deploy MLMs with the ArdenSuite - SIRS Notification as an Example for a practical guide on how to use the ArdenSuite IDE.
Find more how-to instruction manuals as well as the files to accompany the manuals in our Learning Center.
# System Requirements
In order to use the ArdenSuite IDE, you will need:
- A system running a 64bit (x86_64) operating system.
- At least 300MB of free storage on your drive.
- For further troubleshooting, see Eclipse Installation Guide or contact us at support@medexter.com.
# Installation
NOTE
There are different versions of the ArdenSuite IDE available, according to operating system. Please choose the correct download link for your operating system (Windows, macOS, Linux).
- For Windows: To install the ArdenSuite IDE, use the provided installer (
.exe) you downloaded from www.medexter.com. After the installation, the application can be executed by double-clicking the enclosedide.exefile or the shortcut on the Desktop, if you decided to create one. - For Linux: To install the ArdenSuite IDE, please unpack the archive file (
.tar.gz) you downloaded from www.medexter.com at any location. The application can be executed by double-clicking the enclosedidefile. - For macOS: Mount the disc image file (
.dmg) you downloaded from www.medexter.com by double-clicking it. A window will open. Drag and drop theArdenSuite IDEonto theApplicationsfolder. The application will be installed and you can find it in your Applications directory. The application can be executed, like any other macOS application, by double-clicking theArdenSuite IDEentry in yourApplicationsfolder.
By default, the IDE creates a new workspace in your home directory called ArdenSuiteWorkspace.
Put simply, the "workspace" is just a directory stored on your local drive, where you can create
Arden Syntax projects and work with MLMs. Your workspace can be, however, changed at any time
by clicking on File -> Switch Workspace and selecting any folder on your system.
We recommend using a directory that does not contain any special characters in its name.
# License Activation
# First-Time Activation
After the successful installation of your ArdenSuite IDE, you have to activate your license. When first starting the program, a license wizard will appear where you will be asked to enter your purchased product key or to activate the Trial Version.
NOTE
If you wish to activate your Trial Version, make sure that you are installing the IDE on a computer with an active internet connection, otherwise it won't work. After the 30-day trial period, it is necessary to purchase a license in order to continue using the ArdenSuite IDE.
The window that appears looks like this:
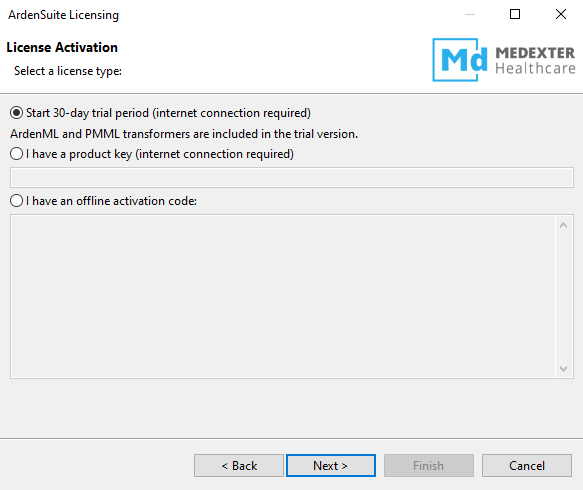
You have the following options:
Start 30-day trial period
Select this option if you want to start the 30-day trial period. Ensure that you are working on a computer with internet connection and if that's not possible, please contact support@medexter.com.I have a product key
If you have already purchased a license, enter the product key in this field. As the key is activated online, ensure that you are working on a computer with internet connection. The IDE will contact Medexter's license server and after validation, the license will be activated. After a successful activation no active internet connection is required to work with the IDE.I have an offline activation code
If you do not have an internet connection on your working computer, you can perform an offline activation. First enter your valid product key into the "I have a product key" field. An offline activation request code will be generated. Please contact support@medexter.com with this request code. After you have received an offline activation code from us, you can enter it in this field ("I have an offline activation code").
# Access Your License Information
If you want to know the expiry date of your activated license you can
view your license details by going to
Menu \ ArdenSuite \ View License. The window looks like this:
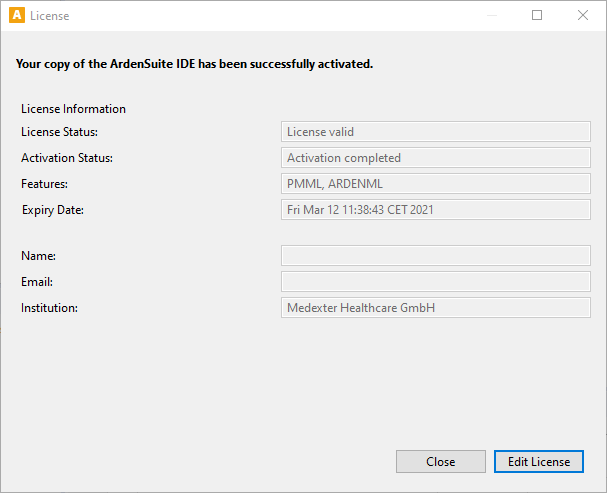
A correct license has the status License valid and Activation completed. By clicking "Edit
License" you can enter a new product key (in case you changed your
license) or re-enter your product key (in case of re-activation after
your license has expired).
# First Steps
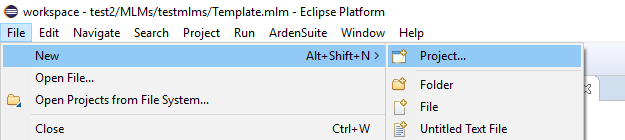
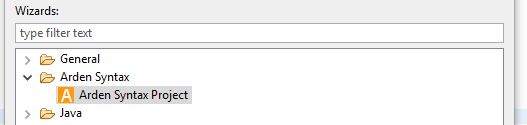
Using the menu bar, click File -> New -> Project. A project creation
wizard opens. Eclipse may also offer the Arden Syntax Project option
as a quick option directly under File -> New
Select Arden Syntax Project from the category Arden Syntax. Choose a
project name. Either click Finish to create the project, or use the
Next button to modify the maintenance slot of the template MLM of this
project. In the project's template MLM, the following information can
be specified:
- MLM title
- MLM name
- Arden Syntax version
- Institution
- and the folder name which will be generated along with the MLM
To create additional MLM files in an already existing project, use the
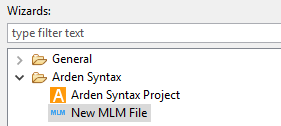
menu bar File -> New -> Other to open up another file wizard.
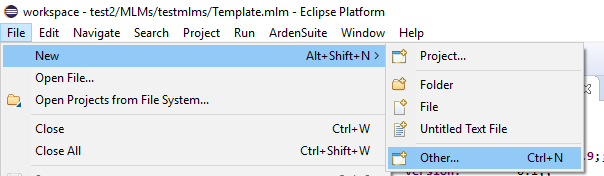
Select New MLM File from the category Arden Syntax. The wizard
allows to choose a file name and the location where this file should be
generated (Browse button). Choose from the existing projects where the
MLM file should be saved. Make sure that the file ends with an .mlm
extension.