# Connectors
NOTE
Depending on your ArdenSuite Server's license and configuration, not all of the connectors described in this section might be available to you.
In this section we describe the connectors that were developed for the ArdenSuite Server. These connectors allow to access data from different types of data sources from within MLM files using curly brace expressions.
WARNING
As the Arden Syntax specification does not regulate the content of curly brace expressions, their validation is declared institution-specific and no restrictions are posed on their content. Therefore, it is the MLM author's responsibility to provide valid expressions; connectors do not verify validity. If an error occurs during execution of a statement, the error is recorded in the log files.
The following connectors can be offered for use with the ArdenSuite Server:
- Database Connector: Used to allow MLMs to query data from a database and process the returned data inside MLMs.
- FHIR Connector: Used to allow MLMs to query data from a FHIR server and process the returned data inside MLMs.
- openEHR Connector: Used to allow MLMs to query data from an openEHR server and process the returned data inside MLMs.
# Connector Options
In curly brace statements, a programer has 3 options to specify which connector or connector data source to use:
READ { Patient/id }READ { <connector_id>: Patient/id }READ { <connector_id>:<data_source_id>: Patient/id }
The <data_source_id> identifies a connection configuration by
name—added via the
ArdenSuite
Server frontend (menu -> Connectors). Supported values for
<connector_id> are:
- fhir e.g.,
READ { fhir:Patient/id } - openehr e.g.,
READ { openehr:EhrServer1:query/?aql=select bp... } - database e.g.,
READ { database:Select * from Patient }
Additionally the destination operator supports the following identifiers (at the moment, destination is supported by the FHIR Connector only):
Destination { fhir:<operator_id>:Patient/id }Destination { fhir:<data_source_id>:<operator_id>:Patient/id }
The following <operator_id> expressions are supported (create, update, delete), e.g., for fhir:
Destination { fhir:source1:create:Patient/id }Destination { fhir:create:Patient/id }Destination { fhir:update:Patient/id }Destination { fhir:delete:Patient/id }Destination { create:Patient/id }
e.g., for the database connector:
Destination { database:source1:create }Destination { database:create }Destination { create }
By using <data_source_id> inside MLMs, data from multiple data
sources of the same connector type may be processed by one MLM since the
server does not have to use the currently active connection for each
statement.
# Priority Levels
There are four ways a READ/WRITE is provided with a data source connection: If no data source is set, the database connector's default connection is used. For each connector, a default connection may be chosen. The Arden Syntax developer may specify which connection to use for each READ statement. Using CDS Hooks, a FHIR server may be set as default connection for the called MLM inside the REST body. In the following we will explain which connection takes precedence if multiple connections are available:
# CDS Hooks READ statement
| READ statement | Description |
|---|---|
READ { fhir:source1: Patient/id } | It does not matter if the CDS Hooks call was sent including a FHIR server URL, the FHIR source with the name "source1" specified in this read call will be used. |
READ { fhir: Patient/id } | If a FHIR server was specified inside the CDS Hooks call, this URL will be used. Otherwise the ArdenSuite Server tries to find a FHIR configuration where the active flag was set and will use that one. If any other connector id than "fhir" is used, the FHIR server specified inside the CDS Hooks call will be ignored. |
READ { Patient/id } | If a FHIR server was specified inside the CDS Hooks call, this URL will be used. Otherwise the ArdenSuite Server will use the Default Connector (backwards compatibility). |
# FHIR / openEHR Connector READ statement
| READ statement | Description |
|---|---|
READ { openehr:source1: Patient/id } | The connection configuration where the name „source1" was specified, will be used to read data. |
READ { openehr: Patient/id } | The connector's default connection configuration will be used (active flag). |
READ { Patient/id } | The Default Connector will be used (backwards compatibility). |
# Database Connector READ statement
| READ statement | Description |
|---|---|
READ { database:source1: Patient/id } | The connection configuration where the name „source1" was specified will be used to read data. |
READ { database: Patient/id } | The connector's default connection configuration will be used (active flag). |
READ { Patient/id } | The Default Connector will be used (backwards compatibility). |
# MLM READ statements
| REST : FHIR Server | Server Default Connector | MLM Connector ID | MLM Data Source ID | Connection used |
|---|---|---|---|---|
| - | - | - | - | uses server default of database connector |
| x | - | - | - | server inside REST call |
| x | x | - | - | server inside REST call |
| x | x | x | - | server inside REST call |
| x | x | x | x | uses data source identified by name |
| - | x | - | - | uses server default of database connector |
| - | x | x | - | uses server default of identified connector |
| - | x | x | x | uses data source identified by name |
| - | - | x | - | no result |
| - | - | x | x | uses data source identified by name |
| - | - | - | x | not valid (curly brace) |
# Default Connector
For any curly brace operation where no connector identifier is specified (see Connector Options section), the default connector is used. Upon delivery of the ArdenSuite Server, the default connector is set to Database Connector. However, the user can change this and set any of the available connectors as default connector.
Configure the default connector using the ardenServer.properties file,
which is located at:
<server_install_directory>\glassfish\domains\ArdenSuiteServer\config\ardenServer.properties.
Use the server.connector.default=<connector_rmi_name> property and
set the respective <connector_rmi_name> name. The
<connector_rmi_name> names for the existing connectors are:
RMIHostInterfaceDatabasefor the Database ConnectorRMIHostInterfaceFhirfor the FHIR / openEHR Connector
If the server.connector.default property is not found within the
ardenServer.properties, the ArdenSuite Server uses the first licensed connector
in the following order: Database Connector, FHIR Connector, openEHR Connector.
This property may also be used to set a custom
connector as default connector, as a custom connector cannot be set via
connector id (like e.g., fhir, database, openEHR) (see Custom
Connector).
# Database Connector
The Database Connector allows medical logic modules (MLMs) to query data from a database and process the returned data inside MLMs.
Whenever the Arden Syntax Engine encounters a database query in a curly brace expression and it is intended for the database connector, the connector determines which of the connections available is to be used, and forwards the query to that connection. Retrieved data elements are transformed into Arden Syntax data types by the Database Connector and returned to the Arden Syntax Engine.
NOTE
Read our instruction manual Achieving Database Connectivity in Arden Syntax Using the ArdenSuite Database Connector - SIRS Notification as an Example for a practical guide on how to use the Database Connector. Find more how-to instruction manuals as well as the files to accompany the manuals in our Learning Center.
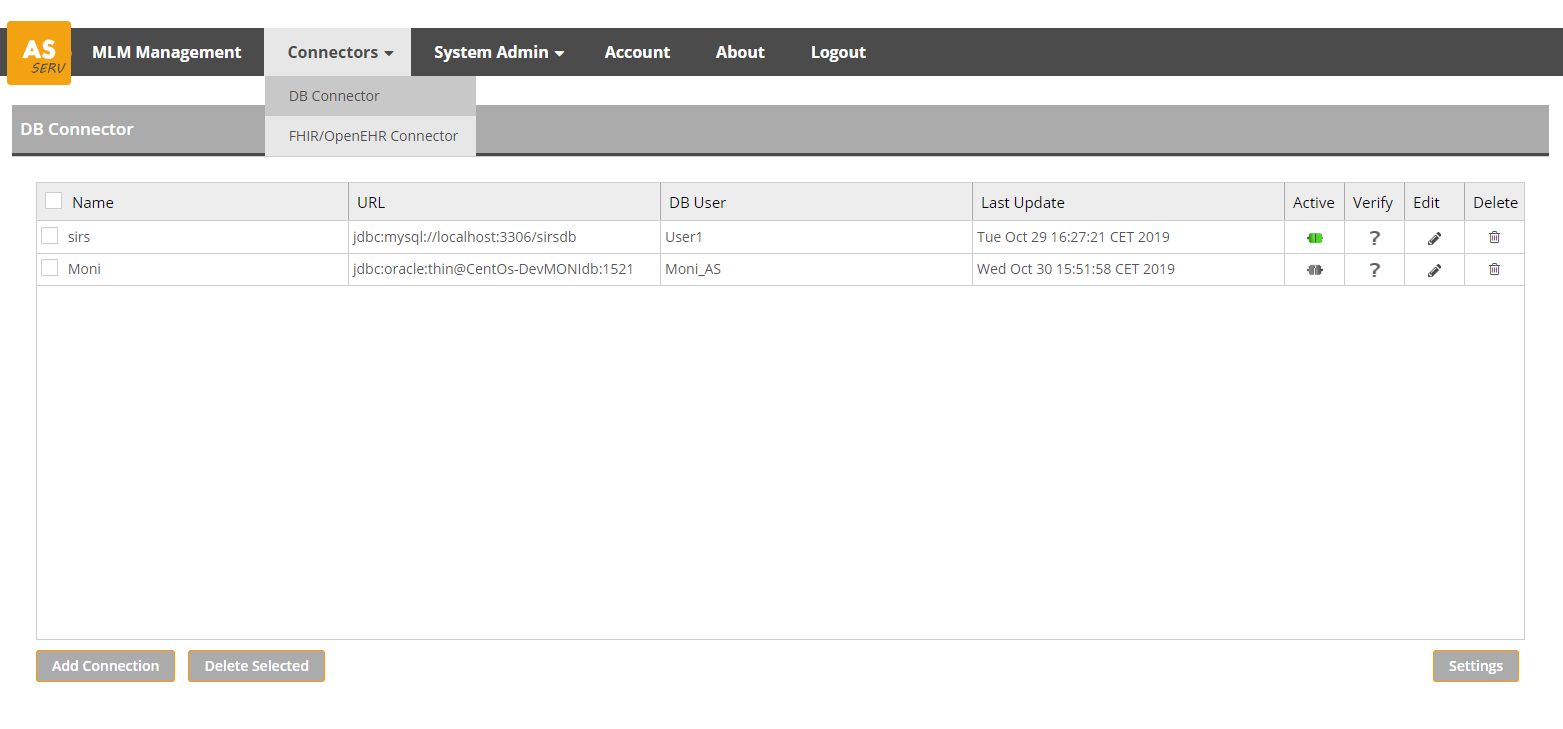
The Database Connector's web interface supports operations that allow you to manage database connections in the connection pool. The following operations are available:
- Add Connection
- Edit Connection
- (De-)Activate Connection
- Verify Connection
- Delete Connection
- Connection Settings
Furthermore, find information below on how to use the Database Connector inside MLMs:
# Add Database Connection
The ArdenSuite Server supports every Database Management System (DBMS) where a JDBC driver is available.
By default, the ArdenSuite Server is shipped with MySQL 8.0.24, PostgreSQL 42.2.19, and Oracle 6 JDBC drivers. If newer versions or other drivers have to be used, simply stop the ArdenSuite Server and copy the JDBC driver to the following location:
<server_install_directory>\glassfish\domains\ArdenSuiteServer\lib
To be able to read data from a database, the server has to be able to connect to that database. Therefore, the user has to configure a connection via the database connection frontend (URL, database user, database password). The JDBC URL format differs from vendor to vendor, here are a few examples:
| Vendor | JDBC URL |
|---|---|
| IBM DB2 | jdbc:db2://<HOST>:<PORT>/<DB> |
| ODBC Bridge | jdbc:odbc:<DB> |
| Microsoft SQL Server | jdbc:weblogic:mysqlserver4:<DB>@<HOST>:<PORT> |
| Oracle Thin | jdbc:oracle:thin:@<HOST>:<PORT>:<SID> |
| MySQL | jdbc:mysql://<HOST>:<PORT>/<DB> |
| PostgreSQL | jdbc:postgresql://<HOST>:<PORT>/<DB> |
Also, depending on the database server installed, the user might have to configure the server or add options to the JDBC URL like for MySQL Server 8:
jdbc:mysql://<HOST>:<PORT>/<DB>?useSSL=false&useUnicode=true&characterEncoding=UTF-8&zeroDateTimeBehavior=CONVERT_TO_NULL&serverTimezone=GMT
The name specified for each connection via the ArdenSuite Database Connector frontend may be used inside of MLMs as an identifier (see section connector options).
WARNING
The URLs above contain placeholders like <HOST>,
<PORT>, <DB>, and <SID> that have to be replaced by the
actual information, i.e., DBMS location, DBMS port. the database name,
and system ID where needed.
The ArdenSuite Server allows to specify a default database connection, which is used in case no other connection has been specified (see connector options section and also keep the priority levels in mind). It is possible to query data from multiple databases in one MLM.
To add a database connection, please click Database Connector in the menu and perform the following steps:
Press the
Add Connectionbutton on the bottom left of the screen. A window will open: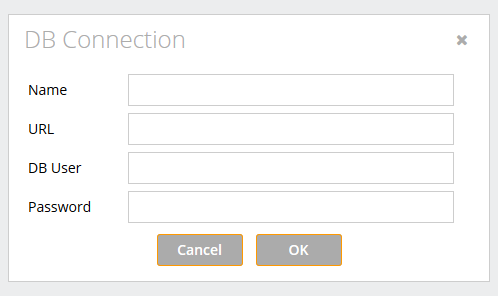
Enter the following information:
Name: Chose any name for the connection. This name will be shown as connection name in the list of connections in the ArdenSuite Server frontend and will also be used as ID within MLMs:
NOTE
This name is used in curly brace expressions as the
<data_source_id>within MLMs (see connector options section).URL: The database URL as described above.
DB User: The database account username for authentication.
Password: The corresponding database account password for authentication.
Click
OKto create the connection, otherwise clickCancel.
# Edit Database Connection
To edit an existing connection, perform the following steps:
Select the connection you want to edit.
Press the
 button at the
selected connection.
button at the
selected connection.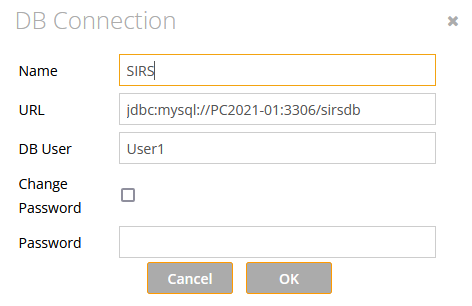
Edit any of the pre-filled fields.
To change the password, select the
Change Passowrdfield, as the password is ignored otherwise.Click the
OKbutton to commit modifications, otherwise clickCancel.
# (De-)Activate Database Connection
To activate a connection:
- Press the
 button at the
selected connection
button at the
selected connection
If the connection was correctly configured, the connection activates
successfully, and the icon changes to a green color
(![]() ). To deactivate a connection, click
on this green icon, and the connection turns inactive. As only one
connection can be active at a time, activating a connection
automatically deactivates a prior active connection.
). To deactivate a connection, click
on this green icon, and the connection turns inactive. As only one
connection can be active at a time, activating a connection
automatically deactivates a prior active connection.
NOTE
If a connection is set active, it means that the connection will be kept open at all times, ready for use. Nevertheless, you can use multiple, different databases as data sources inside an MLM. If you query data from non-active connections, a connection is first established and then closed each time a database operation is executed (see connector options section).
# Verify Database Connection
To verify, whether a connection was correctly configured or not, it can be verified:
- Select the connection you want to verify
- Press the
 button at the selected
connection
button at the selected
connection
If the connection was correctly configured, the icon changes to a
![]() . If the connection was improperly
configured, or if for some other reason the database cannot be accessed,
the icon changes to a
. If the connection was improperly
configured, or if for some other reason the database cannot be accessed,
the icon changes to a ![]() .
.
# Delete Database Connection
To delete a connection from the connection pool, follow these steps:
- Select the connection you want to delete
- Press the
 button at the
selected connection
button at the
selected connection - You will be prompted for confirmation. To delete, press
OK, otherwise clickCancel
Alternatively, multiple connections can be deleted simultaneously. To delete multiple connections:
- Select the connections you want to delete in the connection pool
- Click the
Delete Selectedbutton at the bottom of the screen.
# Settings Button
This button (on the bottom right side of the Database Connector screen) allows to specify the maximum
number of result rows which may be retrieved during one
query—therefore also specifies the maximum element size of a result
list (e.g., READ statement).
# Code Examples Database Connector
The Database Connector can be used via READ statements inside of MLMs. In order to learn how to identify a data source or how to use multiple data sources in one single MLM, please read the connector options section and also keep the priority levels in mind.
# Arden Syntax
You can write any valid (valid for the respective underlying database) SQL SELECT statement inside curly brace expressions, using the Arden Syntax READ statement. If absolutely needed, the Database Connector also supports INSERT statements inside of Arden Syntax READ.
(temperature, heartRate) := READ { SELECT .... }
listname := READ { SELECT .... }
According to the Arden Syntax specification, an INSERT SQL statement is only supported by a WRITE Arden Syntax statement: To be able to execute a WRITE statement inside the action slot, you will need to specify a destination inside the data slot:
destinationDBWrite := destination { database:SIRSDatabase:create };   // destination is the data source identified by name "SIRSDatabase" (Database Connector frontend)
destinationDBWrite := destination { database:create };                // destination is the selected default data source (active) of the Database Connector frontend
destinationDBWrite := destination { create };                         // destination is the default connector and its default data source
Inside the action slot, the WRITE statement syntax looks like the following:
write "INSERT INTO sirsvalues2(IDPatient, Date, temperature, heartRate, respRate, PaCO2, WBcellCount, immatureBand) VALUES (1,NOW(),34,88,23,3,3,3) " at destinationDBWrite;
A couple of things to keep in mind when writing MLMs using the Database Connector:
In the ArdenSuite Server, only one database connection at a time can be set active. If a connection is set active, it means that the connection will be kept open at all times, ready for use. Nevertheless, you can use multiple, different databases as data sources inside an MLM. If you query data from non-active connections, a connection is established and closed each time a database operation is executed. This might have a performance impact.
Another important point is to be careful when naming variables, e.g.,
(temperature, heartRate, respRate, PaCO2, WBcellCount, immatureBand) := READ {SELECT temperature, heartRate, respRate, PaCO2, WBcellCount, immatureBand FROM sirsvalues WHERE IDPatient = testID};Let's say that this SQL query evaluates to temperature being 39. If you would execute another READ on the same database table in the next line of your MLM e.g.,
xml singelevalue := READ {SELECT temperature FROM sirsvalues WHERE IDPatient = testID};the SELECT statement inside the curly brace expression will evaluate to:`Select 39 FROM sirsvalues WHERE IDPatient = testID`which would result in a failed query—since the ArdenSuite engine sees temperature as a variable where the value 39 was assigned already.
In this case, the variable name "temperature" would need to be different to the database column name "temperature".
# SQL Transformation
Data queried from a database is transformed into Arden Syntax data types.
Querying a single data value from a database results in a simple Arden Syntax value (String, Number, Date, etc.). If multiple values are returned, they are added to a list. If a query returns multiple rows of data, a multidimensional list is generated (each element of the parent list contains another list).
| SQL | Multiple Row Result | Single Row Result |
|---|---|---|
SELECT temperature FROM \... | List (values of each matching row) | simple data type (String, Number, ...) |
SELECT temperature, heartRate FROM \... | List containing lists (inner lists represent a table row) | List of simple data types (String, Number, ...) |
NOTE
If a database table column is named "PrimaryTime" this column is used as primary time for all other values of a queried database table row.
# FHIR and openEHR Connectors
The ArdenSuite FHIR and openEHR Connectors are able to communicate with any external server that supports REST and returns data in XML format. If JSON is returned, the FHIR and openEHR Connectors will try to transform JSON to XML (this may result in the generated XML not being conform to the FHIR/openEHR resources XML schema—the transformed XML is printed to the debug log to be able to determine how to access the data).
Whenever the ArdenSuite engine encounters a FHIR resource query in a
curly brace expression (denoted by the prefix fhir:), the query is
sent to the FHIR Connector module. This module searches for an active
FHIR connection and forwards the query to the connection. Retrieved
data elements are transformed into Arden Syntax data types by the FHIR
Connector and returned to the ArdenSuite engine.
Note
Read our instruction manual Achieving FHIR Connectivity in Arden Syntax Using the ArdenSuite FHIR Connector for a practical guide on how to use the FHIR Connector. Find more how-to instruction manuals as well as the files to accompany the manuals in our Learning Center.
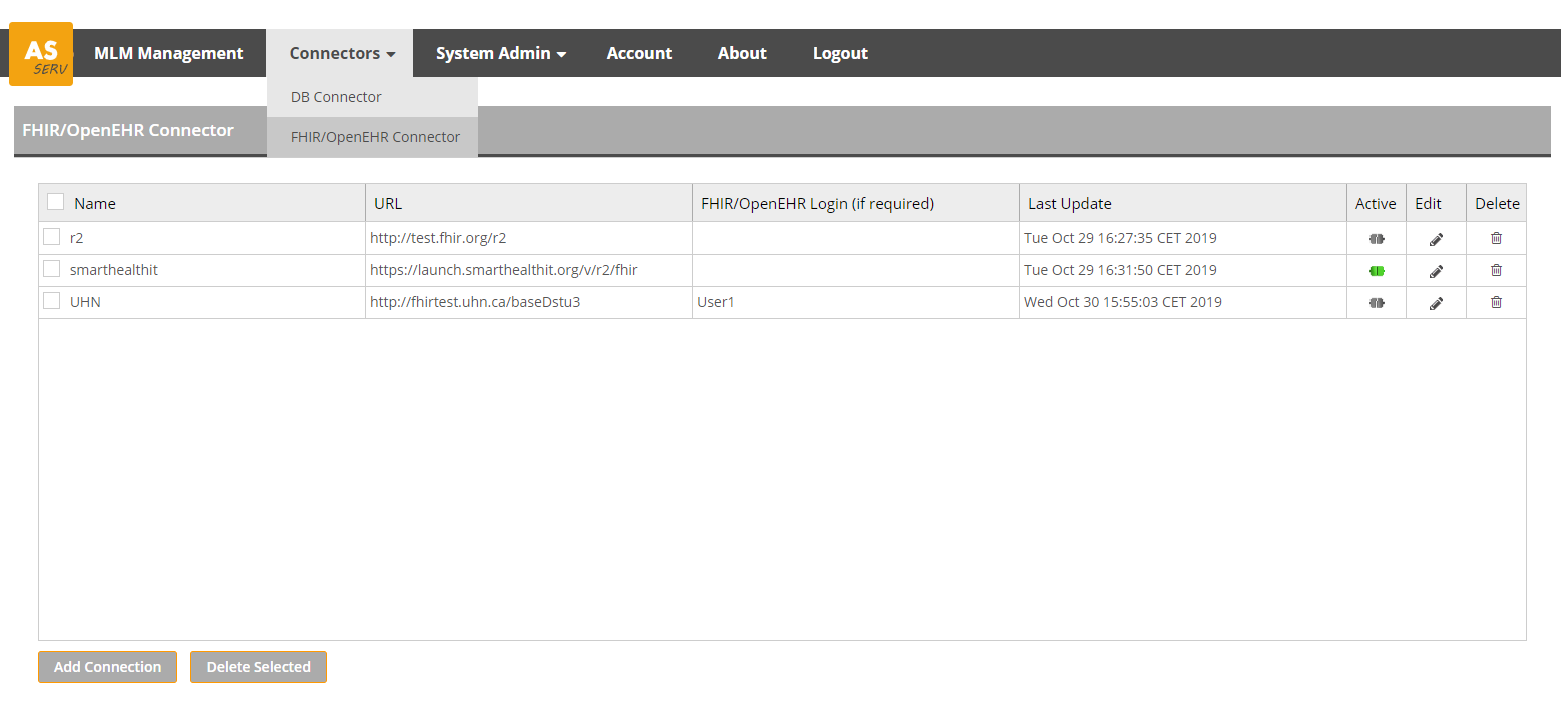
In the FHIR and openEHR Connectors' connection pool, it is possible to manage multiple connections. The following operations are available:
Furthermore, find information below on how to use the FHIR and openEHR Connectors inside MLMs:
# Add FHIR or openEHR Connection
In order for MLMs on the ArdenSuite Server to retrieve data from a FHIR or openEHR resource, a connection between the ArdenSuite Server and the FHIR/openEHR resource has to be established. For this purpose, the user has to configure a connection via the FHIR or openEHR connection frontend (URL, database user, database password). The server URL might look like this:
| Resource | URL |
|---|---|
| IBM DB2 | http://test.fhir.org/r3 |
| ODBC Bridge | http://spark.furore.com/fhir |
| Microsoft SQL Server | http://fhirtest.uhn.ca/baseDstu2 |
NOTE
A list of publicly available FHIR Servers for testing can be found here: http://wiki.hl7.org/index.php?title=Publicly_Available_FHIR_Servers_for_testing
To add a connection, perform the following steps:
Press the
Add Connectionbutton on the bottom left of the screen. A dialog window will open: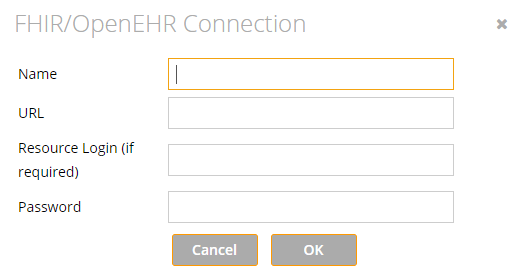
Enter the following information:
Name: Choose any name for the connection. This name will be shown as connection name in the list of connections in the ArdenSuite Server frontend and will also be used as ID within MLMs:
NOTE
This name is used in curly bracket expressions as the
<data_source_id>within MLMs (see connector options section).Restrictions of the connector names
As this name is used in curly bracket expressions the
<data_source_id>must not be in the list of following keywords:- fhir
- openEHR
- database
- create
- update
- delete
Furthermore, only the following characters can be used for the name:
- letters (a-z A-Z)
- numbers (0-9)
_-
URL: The FHIR or openEHR resource URL.
Resource Login: The FHIR or openEHR resource login name for authentication. As some resources don't require authentication, this is optional and can be left blank.
Password: The corresponding FHIR or openEHR resource password, if authentication is required. If not, this field can be left blank.
Click the
OKbutton to create the connection, otherwise clickCancel.
# Edit FHIR or openEHR Connection
To edit an existing connection, perform the following steps:
Press the
button at the selected connection.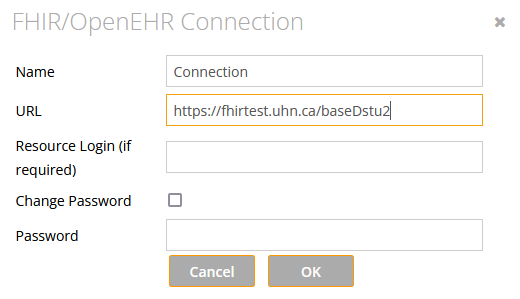
Edit any of the pre-filled fields.
To change the password, select the
Change Passowrdfield, as the password is ignored otherwise.Click the
OKbutton to commit modifications, otherwise clickCancel.
# (De-)Activate FHIR or openEHR Connection
The active connection is used as the default FHIR/openEHR connection (see connector options section). To activate a connection:
- Select the connection you want to activate
- Press the
button at the selected connection
When clicked, the icon changes to a green color
(![]() ).
To deactivate a connection, click on this green icon, and the connection turns
inactive. Activating a connection automatically deactivates a prior active connection.
).
To deactivate a connection, click on this green icon, and the connection turns
inactive. Activating a connection automatically deactivates a prior active connection.
NOTE
FHIR and openEHR resources cannot be validated, thus a green icon only indicates that the connection is active (used as default). It does not indicate that the connection is properly configured, nor that the FHIR or openEHR resource is available.
# Delete FHIR or openEHR Connection
To delete a connection from the connection pool, follow these steps:
- Press the
button at the selected connection.
- You will be prompted for confirmation. To delete, press
OK, otherwise clickCancel.
Alternatively, multiple connections can be deleted simultaneously. To delete multiple connections:
- Select the connections to be deleted from the connection pool.
- Click the
Delete Selectedbutton at the bottom of the screen.
# Code Examples FHIR and openEHR Connectors
The ArdenSuite
Server allows to specify a default FHIR or openEHR connection
(![]() ). Nevertheless, you can use
multiple, different FHIR and openEHR resources as data sources inside an
MLM. Unlike with the Database Connector, there is no performance impact
if a non-default server connection is used instead of the default/active
one.
). Nevertheless, you can use
multiple, different FHIR and openEHR resources as data sources inside an
MLM. Unlike with the Database Connector, there is no performance impact
if a non-default server connection is used instead of the default/active
one.
When querying data from multiple server data sources in one MLM, please be careful when naming variables, e.g.,
    testID:= 102;
    testID:= READ {fhir:Patient/testID}; // here Patient/102 is read
    FHIRPatient:= READ {fhir:Patient/testID}; // here testID represents a FHIR Patient object
# XML Transformation
The ArdenSuite Server does not keep track of FHIR or openEHR versions. Regardless the specific standard version, the ArdenSuite Server just queries an XML resource of another server via REST and transforms it into Arden Syntax data types. This means that the Arden Syntax developer is writing MLMs for a specific version of FHIR or openEHR and might have to adapt them if he or she wants to support a different version.
An XML resource is transformed by generating Arden Syntax objects for each XML tag present. The following section will describe how XML elements are transformed exactly and how the generated Arden Syntax objects can be used inside of MLMs (the following is just an example and is also true for openEHR):
- XML
- MLMobj
- MLM
<Patient>
<xe:Patient>
- XML
- MLMobj
- MLM
<Patient xmlns="http://hl7.org/fhir">
</Patient>
- XML
- MLMobj
- MLM
<p>hans1 mayer1</p>
- XML
- MLMobj
- MLM
    <Patient xmlns="http://hl7.org/fhir">
      <name>
        <family value="hans1"/>
        <given value="mayer1"/>
      </name>
      <birthDate value="1988-02-18"/>
      <text>
        <p style=”blue”>hans1 as</p>
      </text>
    </Patient>
- XML
- MLMobj
- MLM
    <identifier>
            <use value="usual"/>
            <value value="hans1.mayer1"/>
    </identifier>
- XML
- MLMobj
- MLM
    <Patient xmlns="http://hl7.org/fhir">
        <identifier>
            <use value="usual"/>
            <value value="testA3.testB"/>
        </identifier>
        <identifier>
            <use value="usual"/>
            <value value="testA1.testB"/>
        </identifier>
        <identifier>
            <use value="usual"/>
            <value value="testA2.testB"/>
        </identifier>
    </Patient>
NOTE
It is always a good idea to program defensively. Always check if variables are null and return an error message in case it is supposed to be set with a value. Also check if a variable is a list type and act accordingly:
# MLM
    data:
        patientId   := Argument;
        FHIRPatient := READ {fhir:Patient/patientId};
        identifiers := FHIRPatient.identifier;
        ...
    logic:
        idText := "";

        // save access if a variable might be either a single object
        // or a list of objects of the same type

        if identifiers is not null then

          // multiple identifiers are present
          if identifiers is list then
            for id in identifiers do
              idText := idText || id.value.value;
            enddo;
          // only one identifier is present
          else
            idText := identifiers.value.value;
          endif;

        endif;
        ...