# FlexScan
Use these highly customizable queries to answer your specific clinical, epidemiological, and QM questions. Momo offers 59 query parameters which can be applied to the available data—including bacteria and fungi with AMR profiles, PCR results, serology results, toxins, microscopy results, remarks, and miscellaneous others. Furthermore, you can choose which information shall be displayed in the query results. Additionally, you can apply comprehensive filtering options.
# Create a new FlexScan query
Press the FlexScan menu item in the menu bar and follow the steps listed here. A detailed explanation of each step can be found below:
- Configure your query.
- Optional—Select Columns.
- Optional—Define data filters.
Alternatively, a FlexScan query can be started by:
- Executing an existing template
- Editing an existing FlexScan query from the list of queries
- Opening a FlexScan result and editing the query
NOTE
Press Save to create a template from your current FlexScan query. The template will be saved to the list of templates and can be used for future querying.
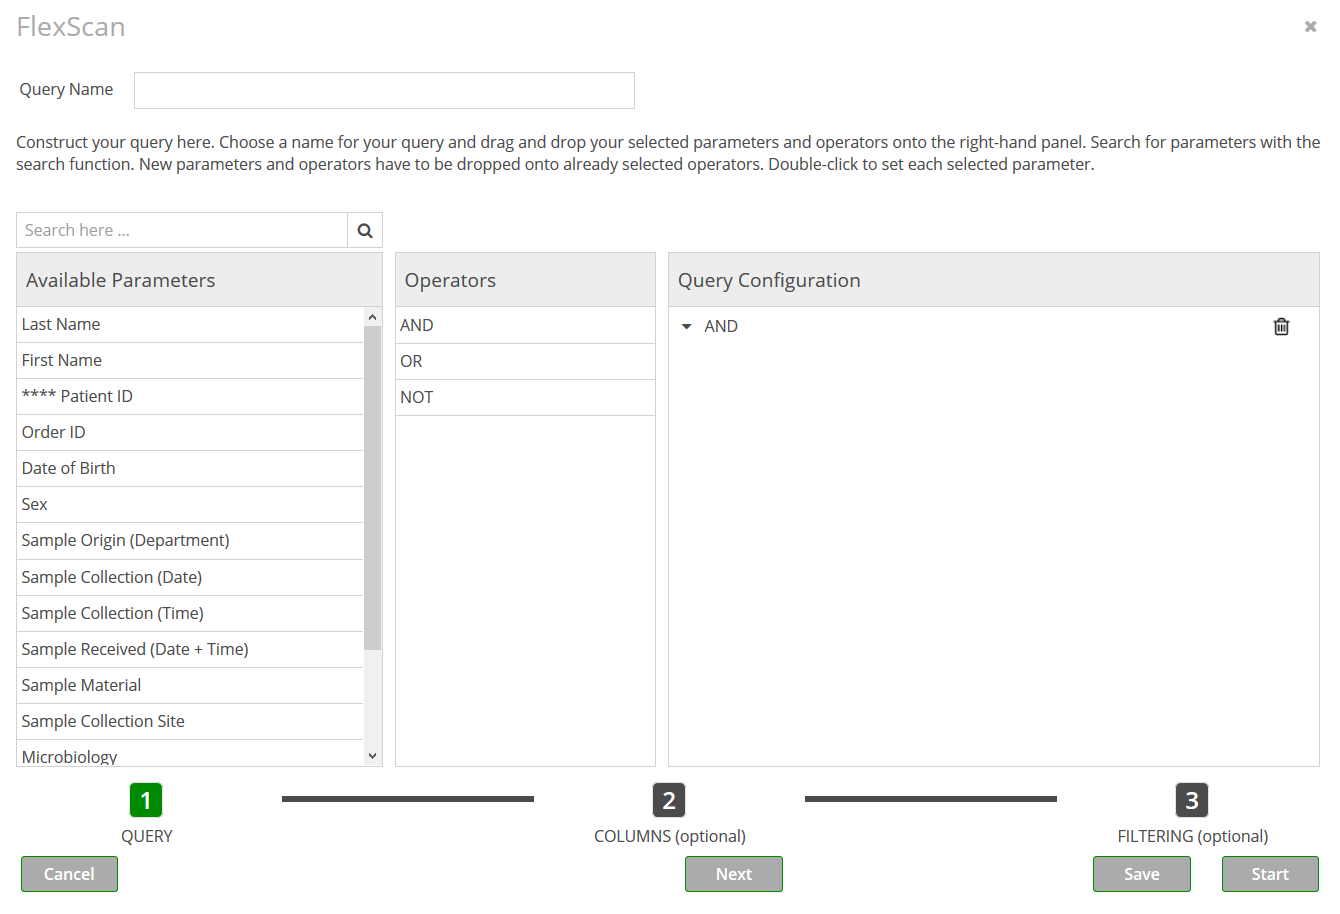
# Step 1—Query Configuration
First, please provide a Name for your query. Then choose operators and parameters according to your needs:
**Available Parameters**: This list contains 59 clinical and administrative parameters that can be used for querying. According to your selected parameters, the amount of data will be reduced, showing only items that correspond to your selection.The 16 most important Query Parameters are always visible in a predefined order. The rest is alphabetically ordered and will only be displayed if you click on the category
More (in alphabetical order). You can also search for parameters using the search field above the list.**Operators**: The logical operatorsAND,OR, andNOTcan be used to create a complex query. Use these operators to link query parameters (operators can also be linked with parameters under other operators):
AND: All parameters and operators linked underANDhave to simultaneously apply to a lab result in order to show up in the FlexScan result.OR: At least one of the parameters and operators linked underORhas to apply.NOT: None of the parameters and operators linked underNOTmay be present in the lab result.
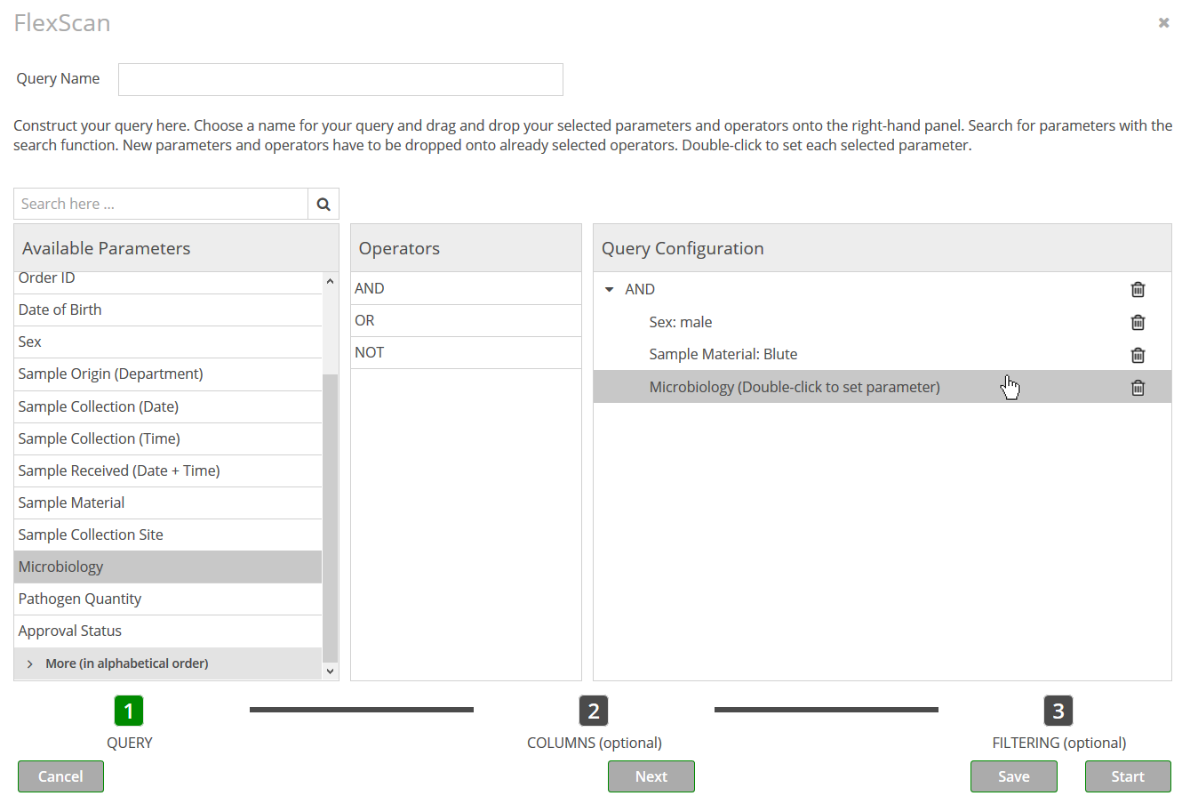
**Query Configuration**: This is where you drag & drop your selected parameters and operators. By default, it contains the empty operatorAND.
In order to configure your query, please perform the following actions:
Click on the query parameter or operator you want to add and drag it onto an operator that is already present in the
Query Configurationpane.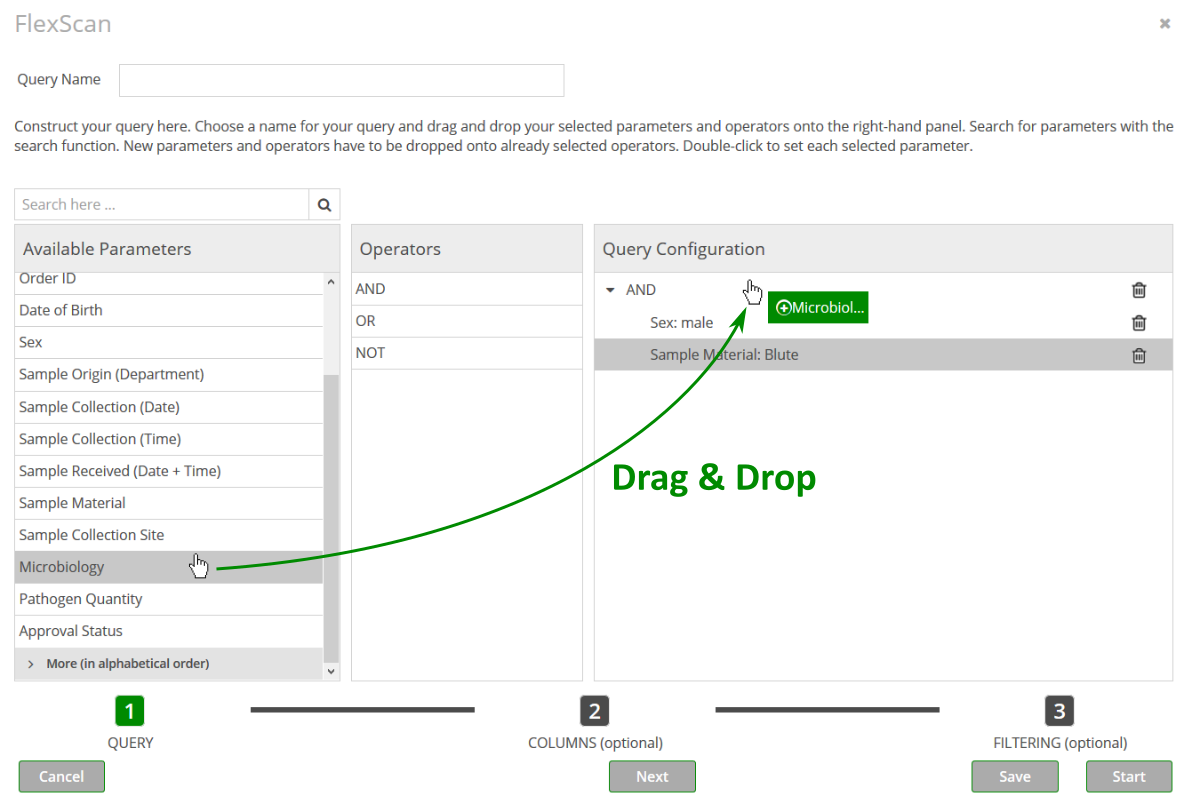
Set the added parameter by double-clicking it. A pop-up window will open where you can choose from the options/values available. For more information on how to set the different kinds of query parameters, see our Query Parameters section.
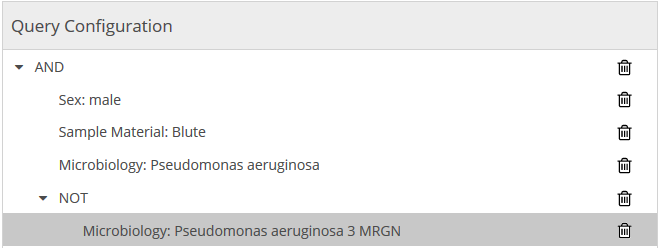
As mentioned above, it is possible to drag & drop operators onto other operators in order to create more complex queries.
Such a query could look like the example shown below. In this case, the AND operator has been there by default. The query parameters Sex, Sample Material, and Microbiology have been added to the operator AND. The operator NOT has also been added to the operator AND. The query parameter Microbiology set to Pseudomonas aeruginosa 3 MRGN has been added to the operator NOT. This would lead to a FlexScan result consisting of blood test results from male patients where Pseudomonas aeruginosa has been found, excluding those with Pseudomonas aeruginosa 3 MRGN.
Once you have configured the query according to your needs, you have the following options:
Either you Select Columns and/or Data Filters or you start your FlexScan without these two optional steps. In this case, a pre-defined column selection will be displayed and/or no filter will be applied.
After starting your FlexScan it can be found in the list of queries.
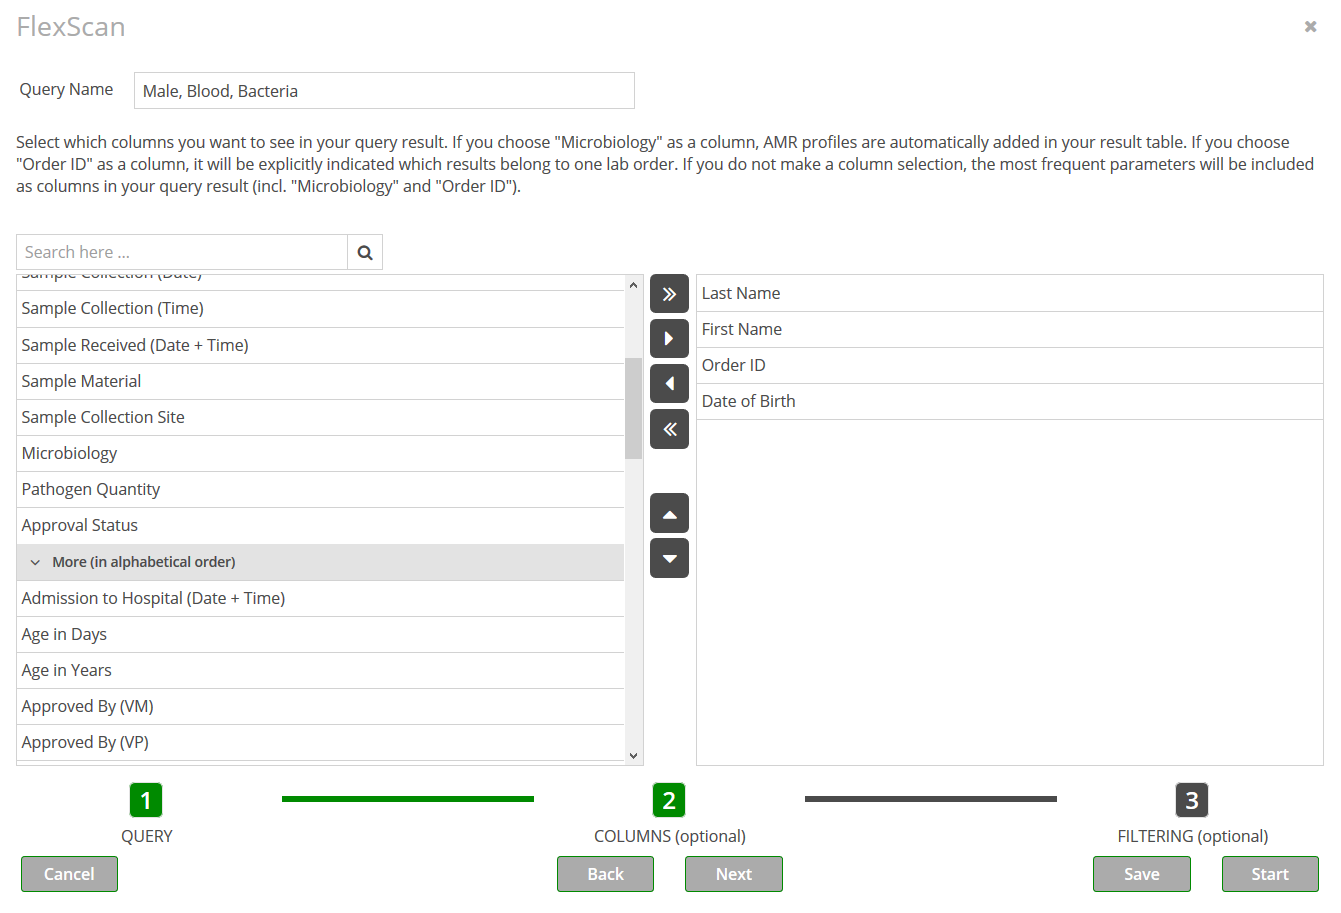
# Optional: Step 2—Column Selection
Select the columns you want to see in the query result:
- The pane on the left-hand side contains 54 items that you may choose as columns to be displayed in the FlexScan query result. The 16 most frequent items are always visible in a predefined order. The rest is alphabetically ordered and can be accessed by clicking on the
More (in alphabetical order)bar. - Drag & drop your chosen items to the empty pane on the right side, where you can sort them—also per drag & drop. Hold down SHIFT or CTRL to select and drag multiple items at once.
NOTE
The customized column selection is optional. If you do not make any selection, the following predefined set of columns will be selected by default:
Last Name, First Name, **** Patient ID, Order ID, Date of Birth, Sex, Sample Origin (Department), Sample Collection (Date), Sample Collection (Time), Sample Received (Date + Time), Sample Material, Sample Collection Site, Microbiology, Pathogen Quantity, Approval Status
NOTE
The column **** Patient ID corresponds to your hospital information system's patient ID. The four **** might be replaced with another text in your version of Momo.
NOTE
If you select the column Microbiology, AMR patterns are automatically added in your result table where available.
NOTE
If you select the column Order ID, it will be explicitly indicated which results belong to one lab order.
# Selecting Columns via Buttons
If you don't want to use drag & drop, you can also use the buttons between the two panes to select your columns:
- Select one or more columns in the left-hand pane.
- Press the single rightward arrow button
 . Similarly, if you want to remove one or more columns from the right-hand pane, select the columns you want to remove and press the single leftward arrow button
  .
. - To select all columns at once, press the rightward double arrow button
 . Similarly, you can remove all columns from the right-hand pane by pressing the leftward double arrow button
  .
. - To change the order of selected columns in the right-hand pane, select a column and either move it up
 or down
  .
.
Once you have selected the columns according to your needs, you have the following options:
- Go
Backand change the configuration of your query. - Continue and configure data filtering.
Startthe FlexScan immediately.- Create a template: Press
Save. Your query will then be part of the list of templates.
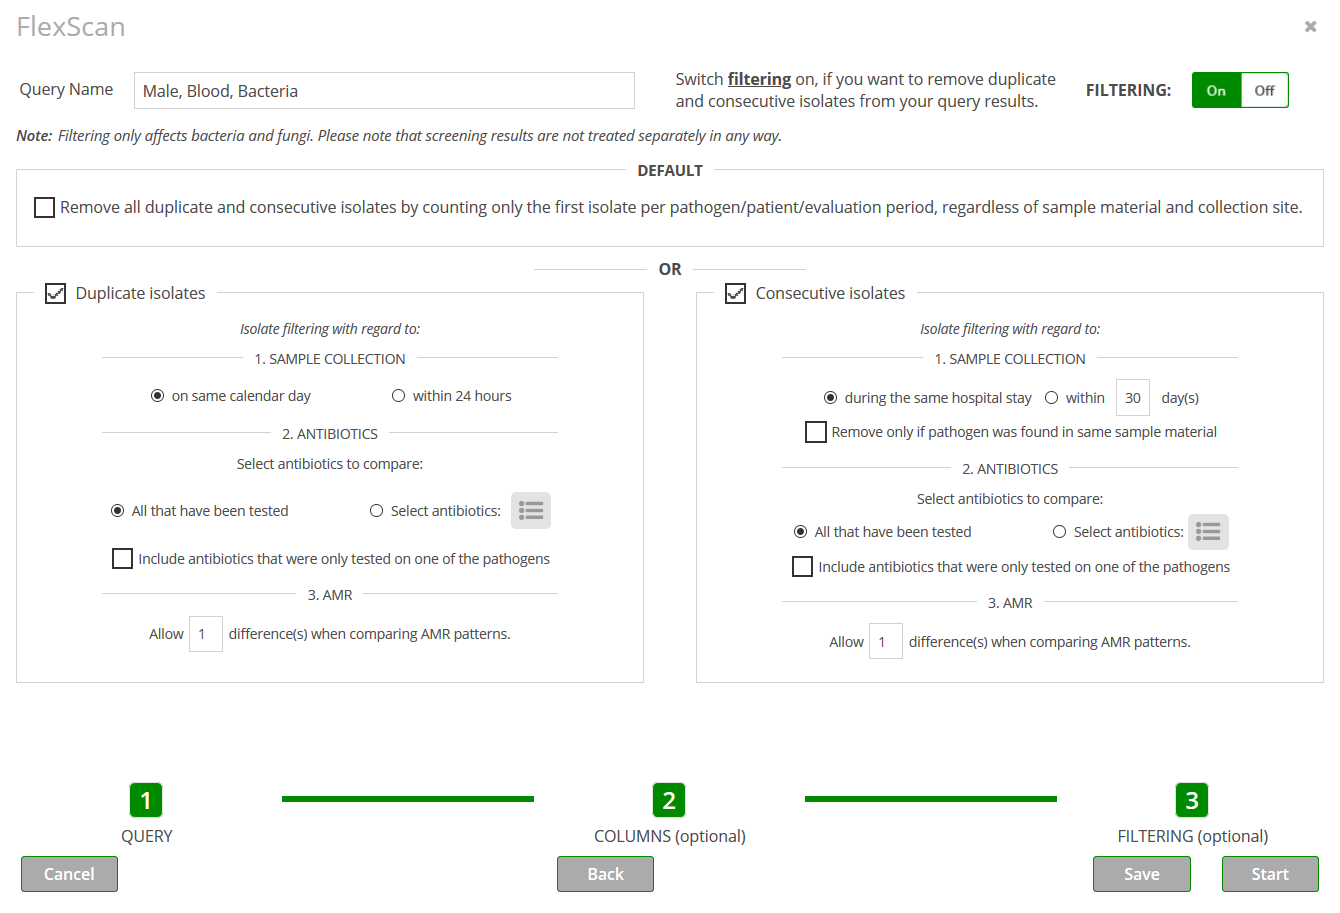
# Optional: Step 3—Filtering
In the third and last step of creating your FlexScan query, you can filter your query for duplicate and consecutive isolates.
Duplicate isolates: Duplicate isolate filtering aims at removing results that show the same pathogen on the same patient in the same material and were collected at (around) the same time.Consecutive isolates: Consecutive isolate filtering aims at removing results that show the same pathogen on the same patient (and optionally in the same material), but were collected at different times.
Activate/deactivate this option by pressing the button ![]() and configure data filtering:
and configure data filtering:
Default: This option removes all duplicate and consecutive isolates by counting only the first isolate per pathogen/patient/evaluation period, regardless of sample material and collection site. If the evaluation period encompasses two or more calendar years, the same isolate will be counted for each calendar year separately. Furthermore, the algorithm will choose results with an AMR pattern over those without.ORby disabling theDefaultoption, filtering for duplicate and/or consecutive isolates can be configured manually.
NOTE
Currently data filtering can only be applied to bacteria and fungi that have been identified by culture-based analysis.
# Manual Configuration
By disabling the Default option, users can manually configure filtering for duplicate and consecutive isolates. Use the checkmarks to enable/disable these two options separately.
The configuration options for duplicate and consecutive isolate filtering look quite similar and entail the following parts:
Sample CollectionDuplicate isolates: You can choose between two options:
on same calendar daywithin 24 hours
Consecutive isolates: The functionality regarding the time of sample collection is similar to the
Duplicate isolate'salgorithm. You can choose between:during the same hospital staywithin an arbitrary number of days
Additionally, you have the possibility to take the sample material into account by checking the
Remove only if pathogen was found in same sample materialcheckbox.
Antibiotics
By default, - in order to determine, if one of two given results is a duplicate/consecutive isolate - Momo compares their AMR patterns includingAll (antibiotics) that have been tested.However, you can restrict the comparison to a specific set of antibiotics by choosing the option
Select antibioticsand pressing the button . There, you can select the antibiotics you deem relevant for the comparison (for more information regarding the selection window, see Query Parameters - Thesaurus Selection).
Furthermore, by default, only those antibiotics are taken into account that have been tested on both pathogens. Check the box
Include antibiotics that were only tested in one of the pathogensif you want to include antibiotics that are only part of one AMR pattern and have not been tested in both.AMR
Here you can specify how many differences between two AMR patterns are allowed for them to be counted as the same isolate. That is to say: assuming you entered the number3into the field and there are 3 S. aureus isolates with 2 differences between the AMR pattern of the first and second isolate and 4 differences between first and third isolate.→ In this case, the second isolate will not be part of the FlexScan query result, because it is interpreted as the same isolate as the first one and removed. The third isolate, however, has got too many differences compared to the first isolate and is counted as separate isolate and will therefore be included in your query result.
Once you have configured filtering according to your needs, you have the following options:
- Go
Backand select the columns to be displayed. Startthe FlexScan immediately.- Create a template: Press
Save. Your query will then be part of the list of templates.
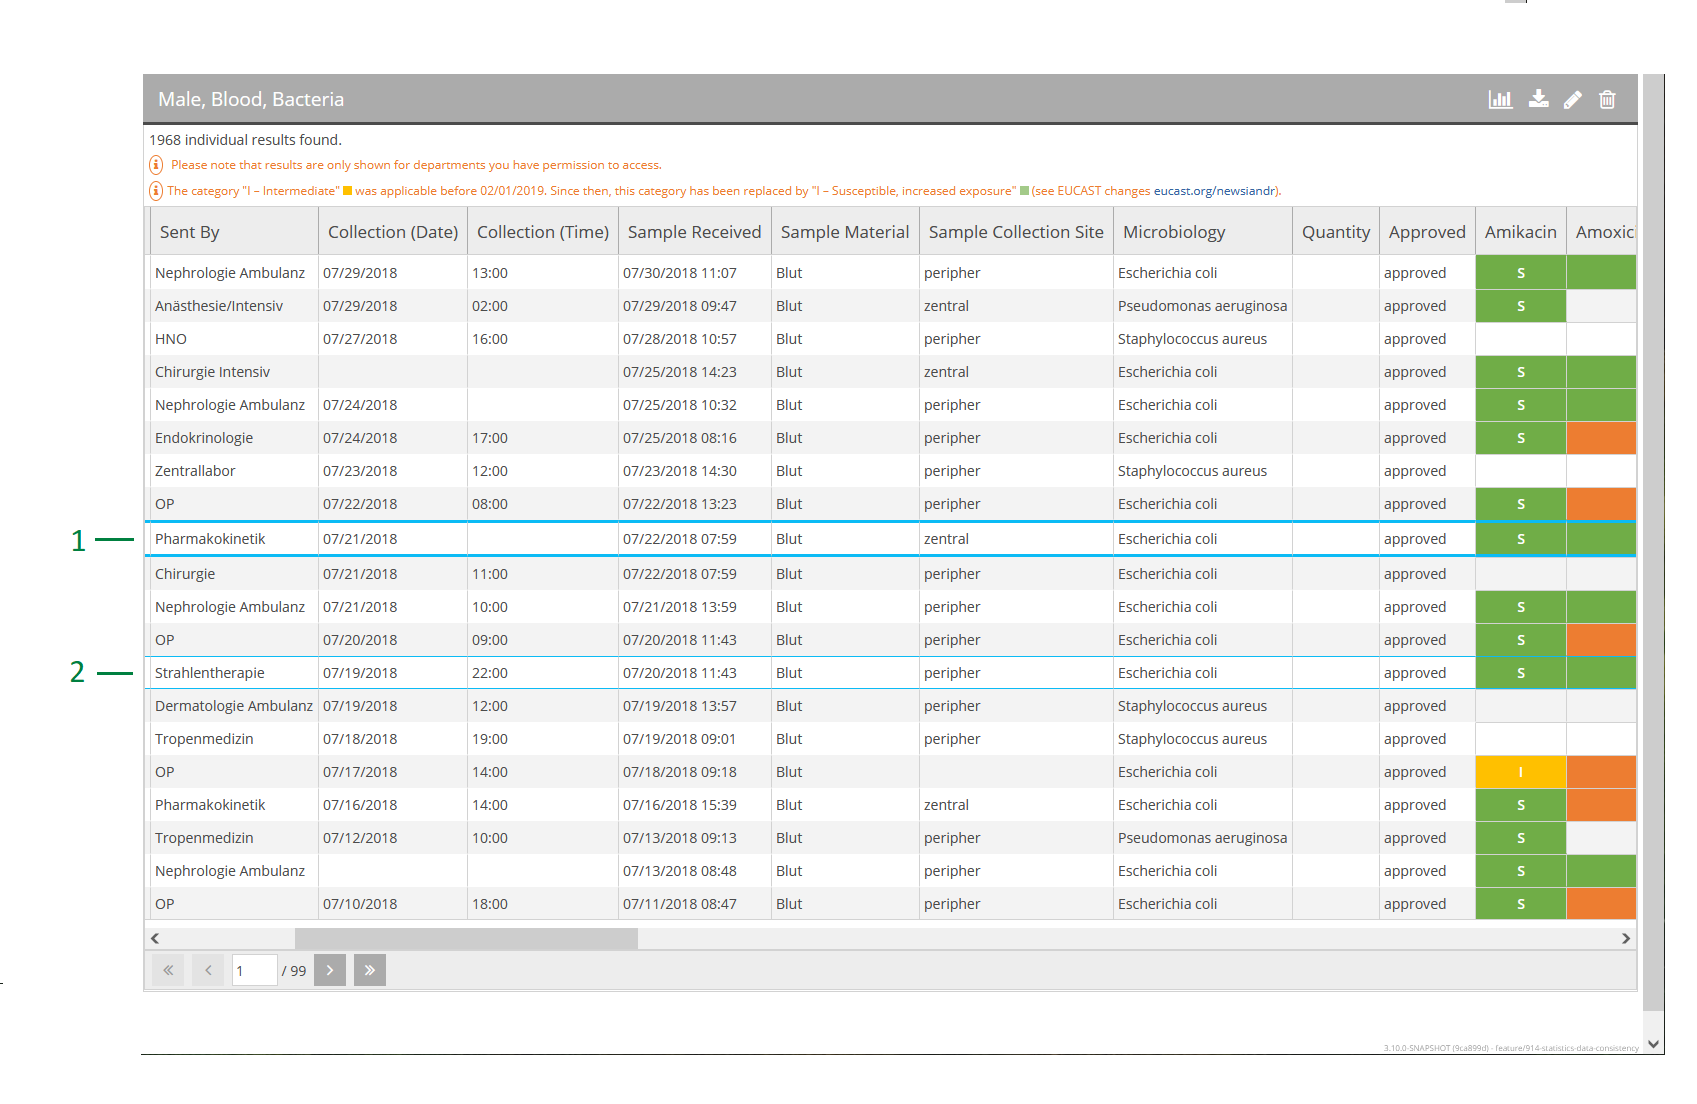
# Results
Find the results in the content area by clicking onto the respective query in the list of queries.
The columns displayed in your query results correspond to your selection. Two columns have special effects on the presentation of the query results:
Order ID:If you selected the columnOrder ID, it will be explicitly highlighted which results belong to one lab order. They will be marked with a slim blue border when hovering over certain rows. By selecting a row, it will be highlighted with a strong blue border.NOTE
If the column
Order IDhas not been selected, results belonging to the same lab order will not be treated as such but as separate results. In this case highlighting when hovering or by selection will only affect one single row.Microbiology:If you selected the columnMicrobiology, the AMR information for the detected pathogen is displayed automatically where available. I.e., for each tested antibiotic, a separate column with the test result is added to the table. In order to make it easier for you to spot important results, the following color scheme has been implemented for the susceptibility testing categories (EUCAST - New definitions of S, I and R, last access: 23 March 2023):- S - Susceptible, standard dosing regimen
- I - Susceptible, increased exposure
- R - Resistant
If available, the minimum inhibitory concentration (MIC) will be displayed along with the susceptibility testing result.
In the following screenshot, the results belonging to one lab order are explicitly highlighted because the column Order ID is present. Furthermore, the selected row is highlighted with a strong blue border (1), whereas the row the mouse hovers over is highlighted with a slim blue border (2).
You can perform the following actions on your FlexScan results by using the buttons on the right-hand side of the title bar:
- Perform Spectrum: Press the Perform Spectrum button
 in order to create a Spectrum query.
 - Export results: Press the Export results button
 . You have two download possibilities, as
 CSV for Excelor as plainCSV. - Edit FlexScan query: Press the Edit query button
 The FlexScan configuration window will re-open with all fields pre-filled. Here, you can re-execute the query, adapt the settings and press
 Start, or create a new template. - Delete query: Press the Delete query button
 .
.